Contents
Introduction
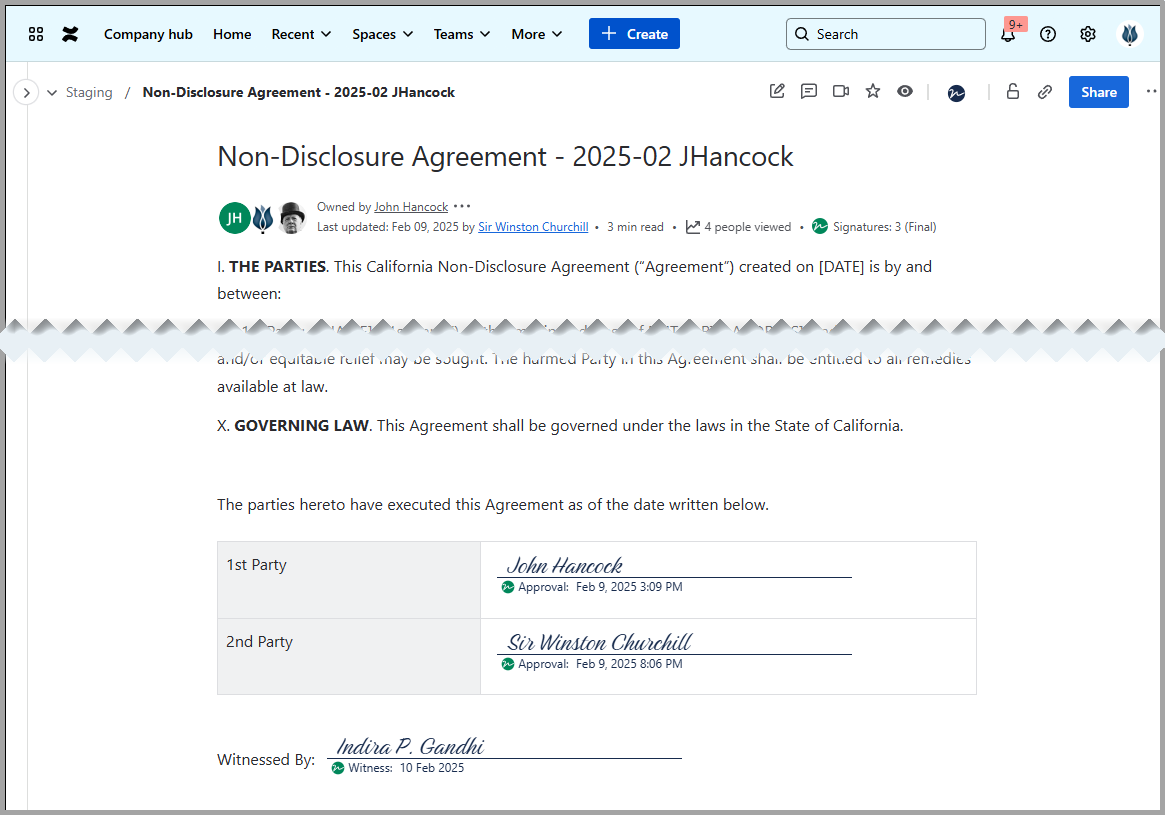
eSign for Confluence allows users to sign pages. Here is an example of a page that was signed by 3 different people.
Demonstration
View this 3 minute video demo (YouTube) for an overview of the signing process: https://youtu.be/T_c6qjNHQdo
Signature Workflow Stages
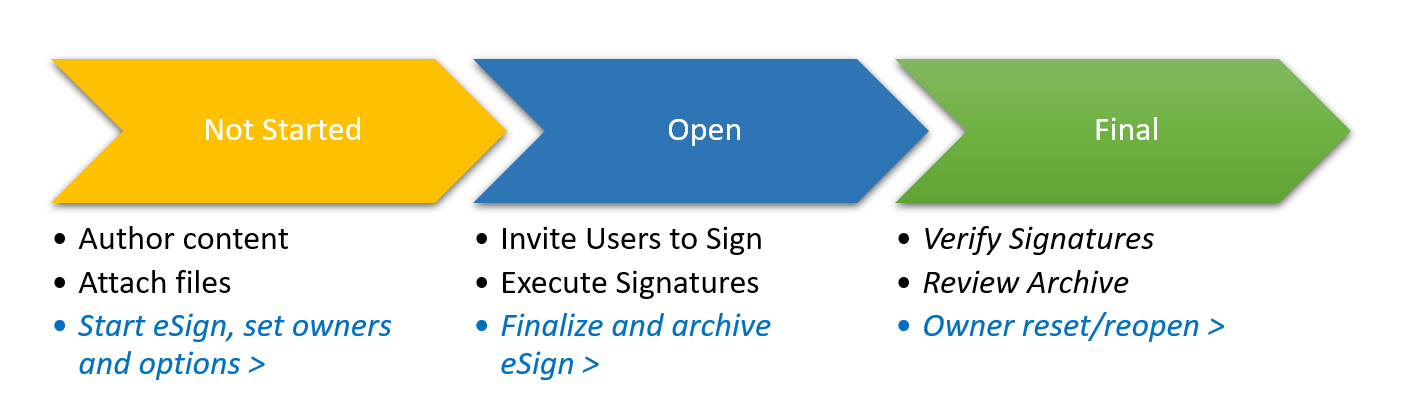
Once you have a sample page to be signed, you can add Signature Tags or Block macros to it in the location you want to collect signatures. Note that pages with Tags already in them can be copied and used as templates. Signing is a 3 stage process:
-
(Not Started) Open the page for signatures via Start;
-
(Open) Invite Users and have them Sign the page;
-
(Final) Signatures are Closed and Verified.
Signature Tag and Signature Block Macros
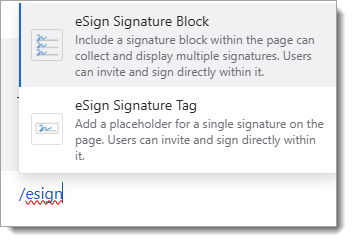
The signature tag and signature block macros can be added to any Confluence page in any location which you have enabled on-page signatures for. Signature tags are for a single signature, while signature blocks allow for multiple signees.
Add these macros to an editable Confluence page by typing “/esign” and selecting eSign Signature Tag or Signature Block from the macro pick-list. Configure the macros to select the signature meaning and display options.
For more information about Signature Tags and Blocks, see this guide .
Opening the Page for Signatures
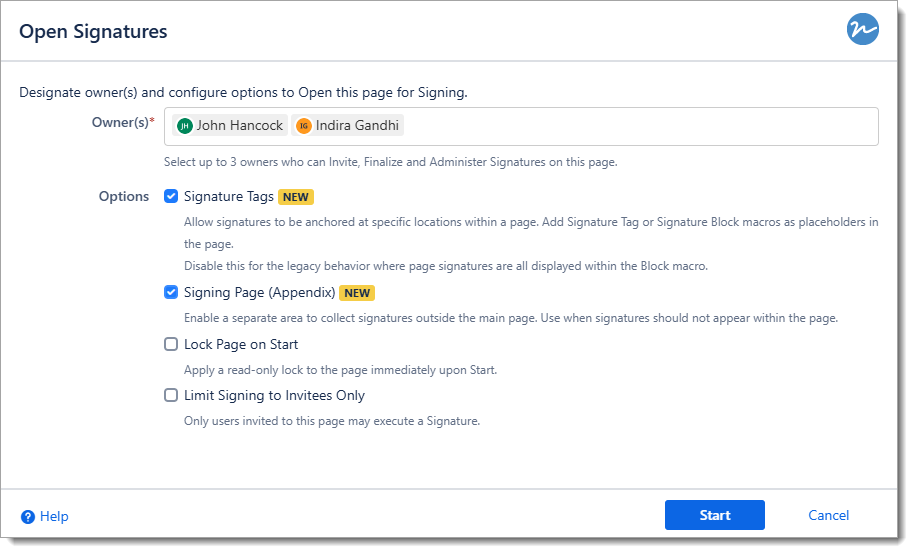
The user who Opens a page for Signatures is by default an Owner; they have the option to add additional users if necessary.
-
Owners can Invite and Administer signatures for the page. Space administrators can act as Owners.
-
The Signature Tags option is required for Signature Tags to be used within the page. Enable this unless you only intend to use Signature Blocks.
-
The Signing Page (Appendix) will collect signatures off-page. Use this when signatures should not appear within the page. The Appendix with those signatures can be saved and printed to PDF.
-
eSign allows you to limit pages to be signed by Invitees Only. This option can be selected on the Open Signatures dialog (see the Start panel above). If selected, only users who are invited to sign will be able to execute signatures on this page. Otherwise the page is open and any logged in user with access to the page can apply a signature.
Inviting Users to Sign
Users are “invited” to sign a page when an Owner or Administrator clicks the Invite User button within the Signature Tag or Signature Block and inputs the intended signees name. Users invited to sign will receive an email with a link to the page.
Each signature tag will have one invitee. Signature Blocks and the Signing Page Appendix can have many active invites.
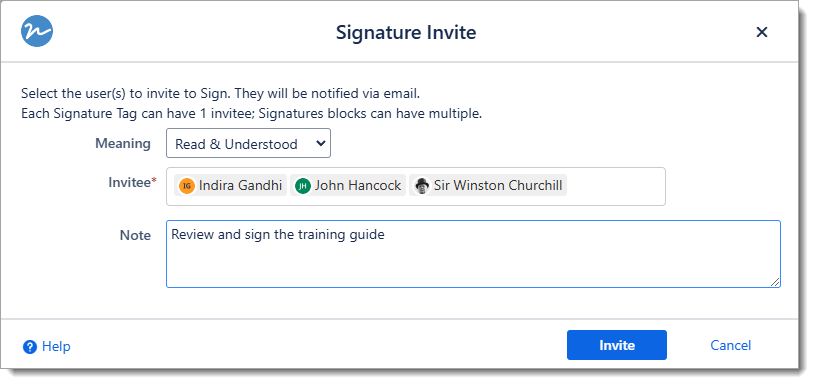
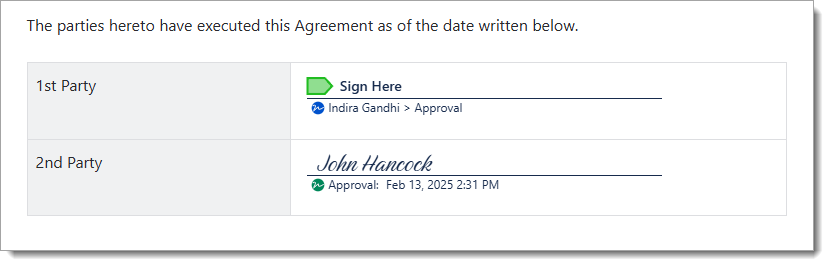
Users that have been invited to sign will receive an email and will see their name and a green Sign Here flag highlighting where they should sign when they view the page.
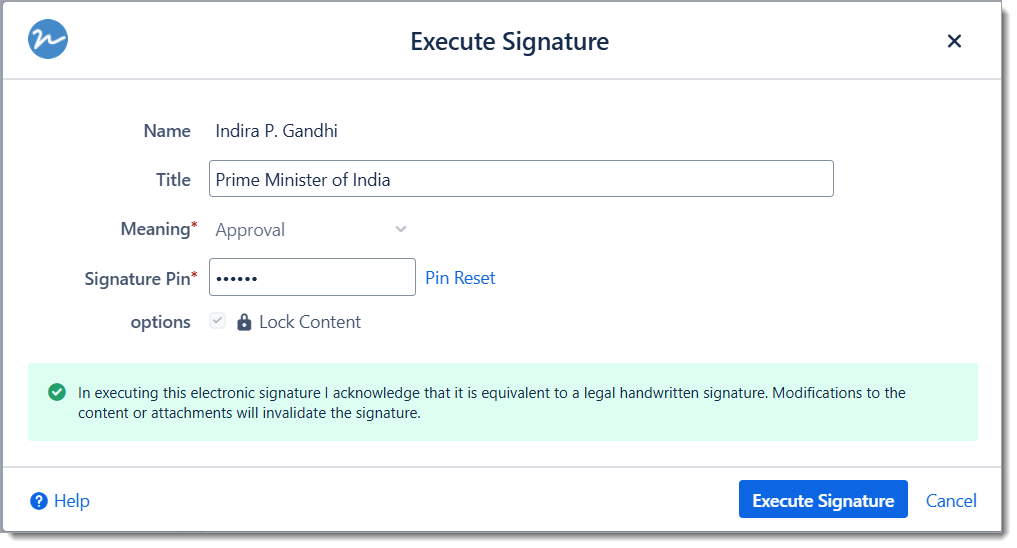
Executing a Signature
Click the Sign Here button to open the Execute Signature dialog. Enter the Users Signature Pin and press Execute Signature. Once authenticated, the signature will be added to the page. See Signature Pins for more information on how they work.
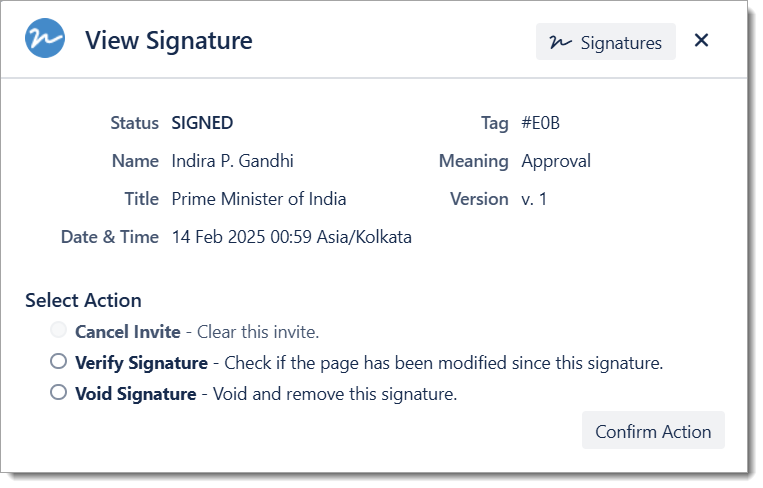
View Signatures
Once signed, details of the signature are available as a drill in from any Signature Tag. The View Signature dialog will show the current signature and allows actions to cancel, verify and void an individual signature.
Signature Pins
To Execute an Electronic Signature, users must first log in to the Atlassian Cloud. Then (if enabled) they are required to enter a Signature Pin with each Signature. This Pin is persistent and can be used repeatedly to sign Confluence pages. The first time a user accepts an invite to sign they will have to request a new Pin via email before they can execute the signature.
If a Pin expires, is locked out, or is forgotten, the user can request a new one via Pin Reset. When this occurs, the eSign system will generate a random pin for that user and send it to them via e-mail. The new pin can be used for Signing immediately. The user can optionally change their own Pin in the eSign User Settings page.
Pin Security Settings
-
Pins are minimum 6 characters in length
-
Pins will lock out after 6 invalid attempts and will need to be reset
-
Pins will expire after 180 days
Manage Signatures
The manage signatures panel will show the current list of invites and signatures and provide access to management functions and reports. It is accessed from the page byline or from the Signatures button in the View Signature dialog.
Use the Finalize button in this page to close and lock down signatures when all signing is complete.
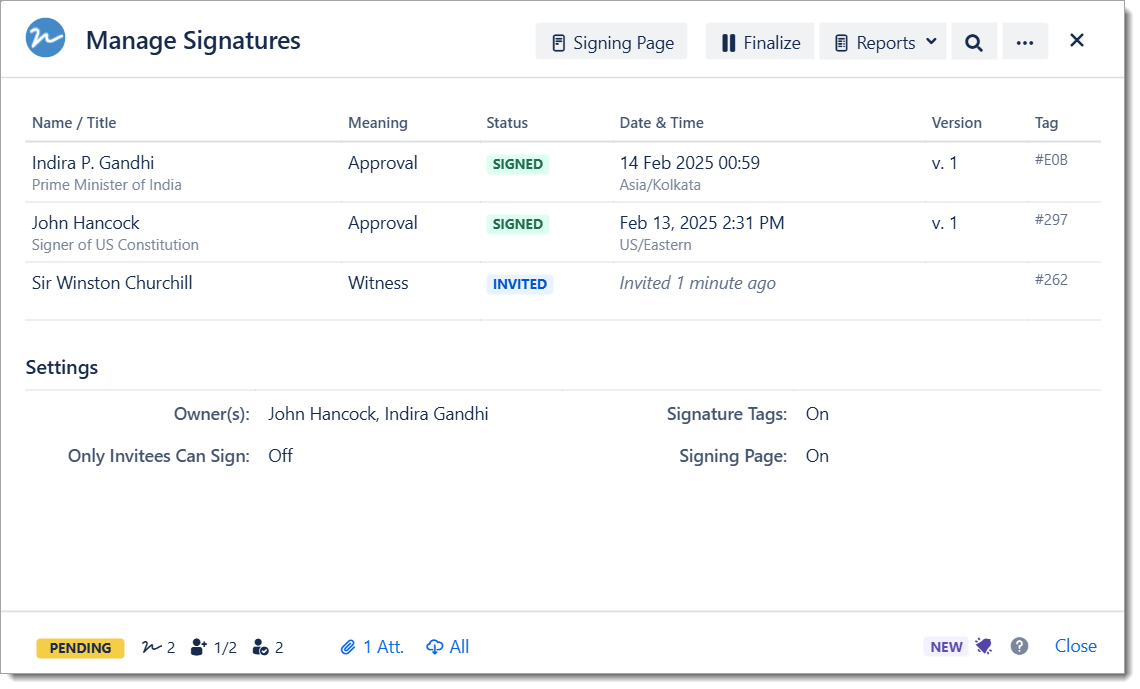
Finalizing Signatures
-
Finalize Signatures to indicate signing is complete. Once Final, no further invites or signatures may be performed on a page.
-
A PDF Signature Archive with all signatures, attachments, comments and page details will be generated and attached to the page (if enabled). See PDF Signature Archives for more details.
-
Owners and Administrators may reopen Finalized pages if it is necessary to capture more signatures.

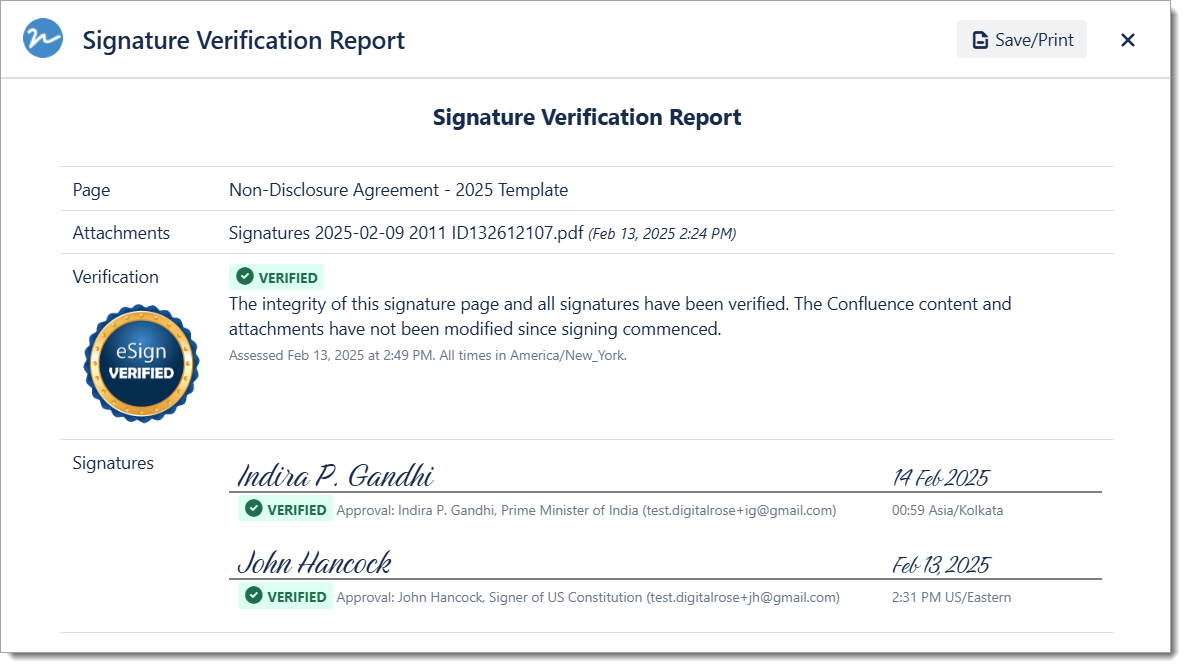
Signature Verification
Each signature is cryptographically locked to the Confluence page version and attachments. The Signature Verification feature is available to confirm that neither the content or attachments of a page has been modified since a signature was captured. Changes to the content/attachments will “break” the signature lock and show as an unverified signature on the certificate.
If a change is required (e.g. updated document revision needs to be signed), the signees can re-sign the updated page. When a signature is re-executed the previous signature is “voided” and may be reviewed in the Signature Audit Report.
To learn more about signature verification, see it in our macros breakdown here .
Signature Verification Report
A completed Signature Report can be generated to verify signature integrity for any Confluence content page.
Next Steps
Continue exploring other aspects of eSign Electronic Signatures for Confluence. Contact eSign Support if you have any questions.
-
Access eSign Search (from Apps > eSign Electronic Signatures or User Profile > My Signatures) to view all signed content in Confluence. See this page of our user guide for more information.
-
See this page of our guide to learn more about adding the eSign Search macro to a page for a custom search report.
-
Try adding the eSign Signature Verification macro to a page to enable live display of signature status. It also works when exporting pages to Word or PDF.
-
Create a new page from an eSign Blueprint. Try the Training Attendance Form or Document Approval blueprint.
-
See Change Logs for news on recent updates.